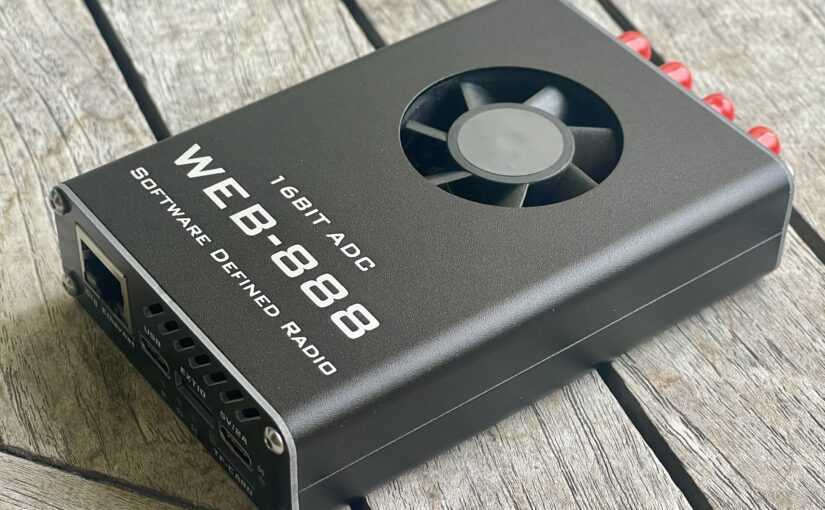
My latest investment in my SDR setup was to purchase the WEB-888 SDR from Aliexpress. Setup was smooth, and finally I replaced my Airspy+ Discovery with the new WEB-888. The WEB-888 allows for 12 HF slots running independently. I have six configured to monitor the FT8 frequencies on the 80, 40, 30, 20, 17, 15 and 10 m bands. Six other slots are free for external users.
For my VHF/UHF setup I am using a dual band Yagi antenna mounted with 20 deg elevation, beaming SSW (210 deg). The signal is fed to a dual band amplifier (DBA) from SSB electronics and split into the VHF and UHF path.
Fixed mounted VHF/UHF Yagi at 210 deg with 20 deg elevation
VHF goes to my Icom IC-9700. If not used otherwise, it is running on the 144.39 MHz APRS frequency. Signals are processed via LAN using the remote Wfview program on a Linux PC routing the AF signal to the Direwolf modem for digipeating.
The UHF signal is fed through a band pass filter to an Airspy Mini SDR. Signals are processed on a Raspberry Pi 4 running a SATNOGS client.
Wfview is a program to remotely control Icom radios. You can find more information on https://wfview.org/.
As I do not have space for my own radio shack and my IC-7610 is located in the living room beside the balcony door, my IC-9700 in the guestroom near to the window, I use wfwiew since a couple of months to operate both radios from my (small) computer desk.
In order to make operation more convenient, I wanted to use my foot switch as PTT. An Arduino micro can emulate a USB keyboard. In wfview PTT is switched using ctrl-t (transmit) and ctrl-r (receive). A simple program on the Arduino micro can do this:
#include <AceButton.h>
using namespace ace_button;
#include <Keyboard.h>

#define LED_BUILTIN 17

const int BUTTON_PIN = 2;
const int LED_ON = LOW;
const int LED_OFF = HIGH;

AceButton button(BUTTON_PIN);

void handleEvent(AceButton*, uint8_t, uint8_t);

void setup() {
  // put your setup code here, to run once:
  pinMode(LED_BUILTIN, OUTPUT);
  pinMode(BUTTON_PIN, INPUT_PULLUP);
  Keyboard.begin();
  button.setEventHandler(handleEvent);
  digitalWrite(LED_BUILTIN, LED_OFF);
  TXLED1;
}

void loop() {
  // put your main code here, to run repeatedly:
  button.check();
  TXLED1;
}

void handleEvent(AceButton* /*button*/, uint8_t eventType,
                 uint8_t /*buttonState*/) {
  switch (eventType) {
    case AceButton::kEventPressed:
      digitalWrite(LED_BUILTIN, LED_ON);
      // ctrl-T
      Keyboard.press(0x80);
      Keyboard.press('t');
      Keyboard.releaseAll();
      break;
    case AceButton::kEventReleased:
      // compensates for network latency
      delay(250);
      digitalWrite(LED_BUILTIN, LED_OFF);
      // ctrl-R
      Keyboard.press(0x80);
      Keyboard.press('r');
      Keyboard.releaseAll();
      break;
  }
}
I have built-in the controller in a small 3D printed housing with a 1/4″ jack plug.
My foot switch solution for wfview
It works like a charm! A similar solution is possible to use a CW keyer (for example K3NG). I open the CQRLOG CW window and input my CW from the keyer to be converted back to text and sent to my IC-7610.
Use your analog handheld transceiver (HT) to report your position, status and receive frequency to the APRS network using DTMF touch tone!
Possible commands to the gateway are shown in the table below. Correct input will be replied with Morse code R for roger, or ? for errors. APRS frequency in Singapore is 144.390 MHz.
Memory
Sequence
Comment
MEM 1
ACxxxxxxxxxx#
Your full 10 digit call sign (always transmit at first)
MEM 2
C9*xxBzzzzz#
Your home location xx (see below), status 9 (set to “APRStt user”) and your 5 digit abbreviated suffix zzzzz (see below)
Keypad
xxBzzzzz# e.g.20B15409#
Set location to xx (zzzzz your suffix abbreviation)
Keypad
xxxxxxCzzzzz# e.g.145500C15409#
Change QRG to xxxxxx (exactly 6 digits), zzzzz your suffix abbreviation.
Keypad
xCzzzzz# e.g.3C15409#
Change status to x: 1 – off duty, 2 – en route, 3 – in service (check in), 4 – returning etc.
To check in to the gateway press MEM 1 for your full call and then MEM 2 to report your location. Afterwards you might change location, QRG, status or symbol using the keypad.
Example: FT-60
On the Yaesu FT-60 HT you have nine available DTMF memories with max. 16 chars each. Two DTMF modes can be selected: MEM and CODE. Press F/W DTMF to toggle between both.
In MEM mode you simply press the PTT and one of the keys 1 to 9 to transmit the predefined DTMF sequence of the respective DTMF memory.
In CODE mode you press PTT and each key 1 … 9 and A … D, *, # will send the corresponding DTMF tone.
Keypad FT-60
How to program the DTMF memories? F/W SET sel 17 -> DT WRT F/W sel d1 … d9 DTMF memory F/W Press keys 1 … 9 or sel A … F followed by F/W for your DTMF tone sequence. E corresponds to “*” and F to “#”. Press F/W > 1 sec to store.
Example: IC-9700
You can also send DTMF sequences from your home station. For example, the Icom IC-0700 has DTMF capabilities with 16 DTMF memories.
IC-9700 DTMF Menu
Select MENU, then 2 and DTMF. EDIT d0 (MEM 1) to enter ACmy10digitcallsign# and d1 (MEM 2) to enter C9*xxBmy5digitsuffix# – xx your home location.
Select Direct Input or d0 … d* to send manual input or predefined sequences.
Determine your 10 digit call sign number
Example: 9V1KG_ is the key sequence “981540“. The last “0” stands for space, as the call sign only has 5 characters. Next we need to add a check sum based on the position of individual letters. “9”: no letter = 0. “V”: 3rd letter of TUV = 3. “1”: no letter = 0. “K”: 2nd pos of JKL = 2. “G” 1st pos of GHI = 1. “Space” 1st pos of _ = 1. The resulting number is 030211. Taken as a base 4 number we need to convert it to a base 10 number:
The resulting 10 digit number for 9V1KG is 9815400805.
Store ACyour10digitnumber# in your 1st DTMF memory.
Shortcut: For Singapore hams (9V1) with a 2 letter suffix just add the position of the first suffix letter (1…3) multiplied by 16 to the second suffix letter (1…3) multiplied by 4 to 769.
Example: 9V1LH_ = 981540, checksum 769 + 48 + 8 = 825 (L: pos 3*16 + H: pos 2*4 ), the result is 9815400825.
Abbreviated 5 digit call sign
Once your full call sign is known to the gateway, it can be abbreviated to the 3 character suffix only. For 9V1KG the suffix is 1KG. Calculation is analogue to the 10 digit call sign. Key sequence for 1KG is “154“. “1” no letter = 0, “5” 2nd letter = 2, “4” 1st letter = 1, i.e. resulting in 021. Converting to a base 10 number:
0 * 16 + 2 * 4 + 1 * 1 = 8 + 1 = 09
The resulting abbreviated 5 digit call sign number is 15409. My full call sign can be abbreviated with 15409 or even shorter 154.
Shortcut: For Singapore hams (9V1) with a 2 letter suffix just add the position of the first suffix letter (1…3) multiplied by 4 to the position of the second suffix letter (1…3).
Example: 1LH = 154, checksum 12+ 2 = 14 (L: pos 3*4 + H: pos 2 ), the result is 15414.
Terminate any tone sequence with ACzzzzz# – in my case AC15409# – the gateway will complement it to your full call sign. You just need to remember a 5 digit number.
After check in with your call sign ACtttttttttt# (MEM1) and home location C9*xxBzzzzz# (MEM2), you can change to a new location by entering the DTMF sequence xxByyyyy# with xx your location number – as shown in the tables below – and yyyyy your abbreviated call sign (see above). Example: Pressing 30B15409# on the keypad in CODE mode will set my location to Bedok.
Finally I made it: my first ever qso in CW via satellite (RS-44). As I only have a free open view of less than 90 deg from my balcony, I have to wait for the right passes, and the time window is usually maximum 10 min.
Setup on the balcony
Using the IC-9700 with the 5 element log. per. antenna on my home brew az/el rotator, I was able to hear my own CW signal from the satellite and manage a qso with E21EJC in Thailand!
Software is Gpredict with Hamlib running on my Mac.
For my VHF/UHF station I am using a dual band five element log-per antenna, similar to the Elk log-per. It is actually an ideal antenna for portable use, as it can be assembled and disassembled easily and packed in a small size. Now the idea came up to use it for satellite communication with my FT-818. The only thing missing was a azimuth/elevation rotator to track the satellites.
I started with my own design, using a stepper motor for azimuth and a servo for elevation. After a while I cancelled the project, as I had too many problems with electromagnetic interference to the servo.
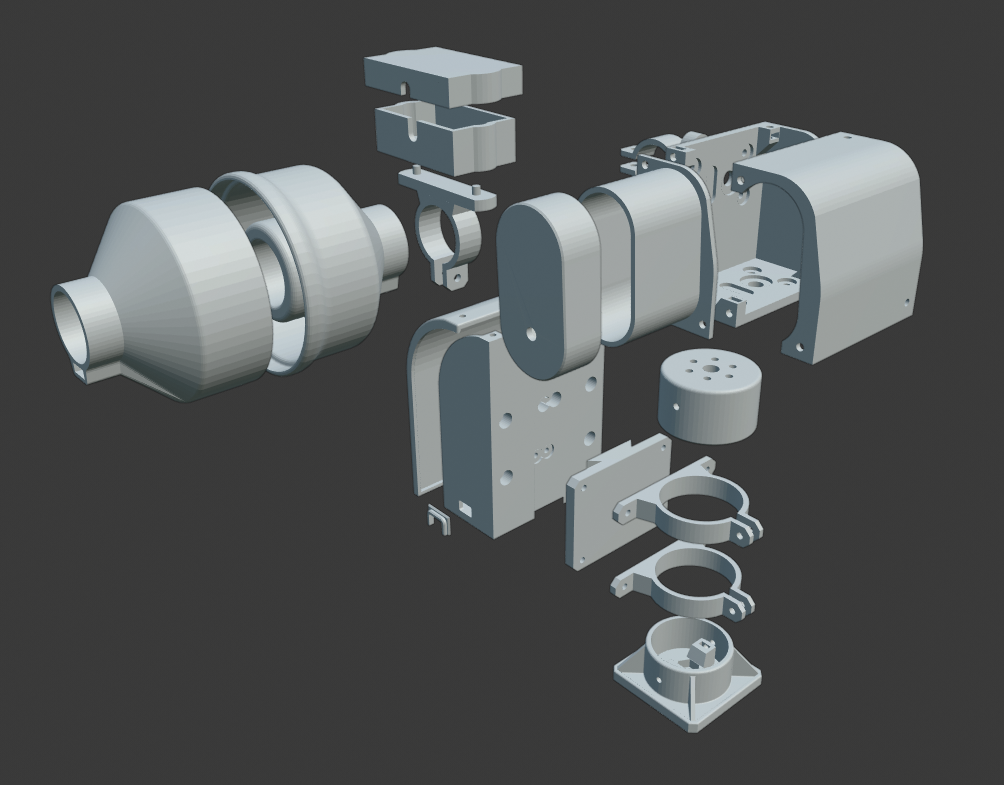
I decided to build it, but to separate motors and electronics; purchased the parts and started the 3D print design. Below the details and the final result.
Overview of all 3D printed parts
Tripod mount
Top mount with hub for azimuth motor
Motor unit mounted to a 32 mm PVC pipe
Housing for electronics, inside view
Housing attached to the pvc pipe
Cutout in the housing
Rail to attach the housing to the pipe
Counterweight using two ferrite torroids
Sensor housing
Antenna holder
The whole package ready for portable use
Test on my balcony
When I first time applied power to the motor drivers, the following happened with a loud bang! Luckily, it was outdoor on my balcony.
The 100 uF capacitor was faulty, this is the result after applying 12 V to the board.
My thanks to SARCNET, the software works w/o problems. I only had another EMI problem, which could be solved finding a well screened micro USB cable and adding a few ferrites.
Approximately a year ago I finally spent the money and bought a 3D printer. My main motivation was that I don’t have a workshop, and therefore I was not able to do even small mechanical things. I decided for the Creality Enders 3 Pro, as this printer has a large community, and it is easy to find tutorials and tons of other information on the web.
For the CAD program I ended up with Blender. It might sound like an overkill, but it’s open source and runs under Windows, Linux and Mac. Blender was the main hurdle, to get active with own designs, as it took quite a while to get familiar with the program using it for precision design.
From then onward, I have realized so many things using the 3D printer, and I can no longer imagine the hobby without this tool. Most items are printed with PETG.
The results are out! The first time I participated in the CQ world wide DX contest from Singapore. 167 contacts, 25 zones, 38 countries with 16.1 hrs operation gave me 22365 points. All with my 5 m whip antenna from the balcony and low power of 100 W.
A couple of weeks ago I started to gather my first experiences with software defined radios (SDR) and active antennas. I started with low investment, using the RTL SDR dongle, but I quickly realized that using the direct sampling mode for HF is not an ideal solution and added the Spyverter HF up-converter.
For my first trials I used a Mini Whip from RA0SMS as antenna, but the results were quite disappointing.
Finally, I ended up with an active loop antenna (see featured image), using the Cross-country Wireless Loop antenna pre-amplifier (10 kHz to 30 MHz version). The pre-amplifier is powered with 13.8 V via a bias-tee. Common mode chokes on the antenna line and all power lines helped to reduce noise, especially on the low bands. This is final hardware setup setup:
The setup is now running 24/7 on a Raspberry Pi 3B+ using GQRX and WSJT-X. I was surprised, how many stations and countries can be decoded down to 80 and 160 m.